Common Questions with Date Format
1. What are the possbile date formats?
2. Can I use any delimiter?
I couldn't find a concrete explanation of the possible date formats but I decided to write one based on trial and and error.
Date dateNow = new Date();
a.
System.out.println(dateNow);
Output: Fri Oct 19 09:26:59 CST 2012
b.
String dateStr = new SimpleDateFormat("MMM/dd/yyyy").format(dateNow);
System.out.println(dateStr);
Output: Oct/19/2012
Use MMM to get Jan, Feb, Mar, Apr, May, Jun, Jul, Aug, Sep, Oct, Nov, Dec
Note: If the output month is not in the format "Oct", you can try adding Locale.ENGLISH:
String df = new SimpleDateFormat("MMM/dd/yyyy", Locale.ENGLISH).format(dateNow);
c.
String dateStr = new SimpleDateFormat("yyyy-MM-dd").format(dateNow);
System.out.println(dateStr);
Output: 2012-10-19
d.
String dateStr = new SimpleDateFormat("yyyy/mm/dd").format(dateNow);
System.out.println(dateStr);
Output: 2012/38/19
Note : In letter D, the output is supposedly 2012/10/19. However, you are using the format "yyyy/mm/dd". The month variable should be in capitals, MM instead of mm.
Note : Also make sure that your year variable are in small letters, yyyy instead of YYYY. It will return an error.
As you can see, the format can be interchangeable.
2. Can I use any delimiter? Yes.
Thursday, 18 October 2012
Thursday, 11 October 2012
Javascript Tricks: Getting the full filepath in Mozilla FF and IE.
During our project, I stumbled upon a problem that seemed unsolveable. I was required to get the full path name:
C:\Documents and Settings\Clare\My Documents\test.jpg
My html code was:
<input id="uploadedFile" name="uploadedFile" type="file" onchange="readFile();">
<input type="hidden" value="" id="uploadFileName"/>
My Javascript/Jquery code:
function readFile() {
var fullPath = $('#uploadedFile').val();
if (fullPath != null) {
alert(fullPath );
$('#uploadFileName').val(fullPath ); //Transfer the file path to hidden field
}
However, this only works with IE. And we mainly use Firefox.
In firefox,
The output is: test.jpg
Note: For security reasons, FF prevents the server to access local information.
In IE,
The output is: C:\Documents and Settings\Clare\My Documents\test.jpg
which is correct.
I have been searching for the solution for almost 8 hours. I have tried using an applet but it didn't work(Probably done it the wrong way). Until I found this 100% working solution:
I forgot the website, but if you are the owner of this code, pls don't hesitate to send me a msg.
Complete html code:
<input id="uploadedFile" name="uploadedFile" type="file" onchange="readFile(this);">
<input type="hidden" value="" id="uploadFileName"/>
Code:
Tuesday, 7 August 2012
Spring MVC Part 1: Hello World
What you'll need:
Eclipse (I use Helios 3.6.7)
Where: www.eclipse.org/downloads/
Maven Dependencies (So that you dont need to download the libraries and let Maven do the job for you)
JBOSS Application server (I'm currently using version 4.2.2)
Mentioned above are just the versions that I use. You can download the latest one, or choose your own server. The focus of this tutorial is Spring MVC.
Note: Make sure that you start your server before running the project. You can do this by opening File > New > Other > Server and select the server you want, in our case choose JBOSS. As a noob myself, sometimes I forget this.
What you'll be doing:
[ ]Controller
[ ]Model
[ ]JSP Page, usually with JSTL
[ ]Run program
First of all, let me discuss what spring MVC means. MVC stands for MODEL VIEW CONTROLLER.
MODEL = Domain Objects
VIEW = JSP page with CSS and HTML
CONTROLLER = Controls which JSP page and MODELS should be displayed
MODEL = Domain Objects
VIEW = JSP page with CSS and HTML
CONTROLLER = Controls which JSP page and MODELS should be displayed
Let's start.
File > New > Project > Other > Spring SourceTool Suite > Spring Template Project > Spring MVC Project
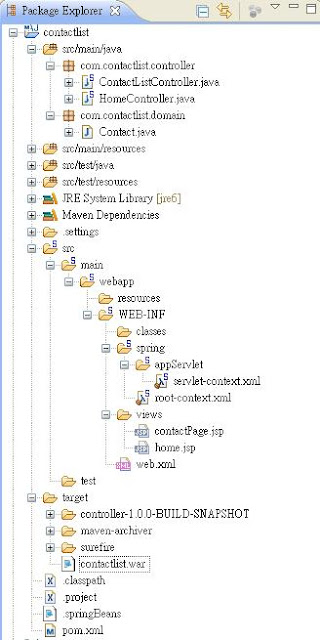
You can see all the files created for you by Eclipse and Maven. And at the bottom of the project, you can see a POM.xml.
Explanation
POM.xml : The pom.xml is generated by Maven. It contains the LIBRARIES needed for you to run the project. The difference between using maven is that YOU DO NOT NEED TO add the libraries manually because MAVEN will do it for you. We would study them one by one in future blog posts. But for now, you can have a look at it first.
/WEB-INF/SPRING: appServlet will be used to process your request.
/WEB-INF/VIEWS: The views folder will contain the JSP pages for your web app. For those who are not familiar with the JSP page, it is similar to HTML but with you can add java functionality.
src/main/java : This folder will contain the controller and other codes for your application.
Step 1. Create a simple contact list that would contain the following fields: Name, Address and Tel. Number.
Go to src/main/java > New > Package
Name: com.contactlist.domain
This package will contain all the "MODEL" or the data. Each class will have setter and getter methods. So let's create ours!
Step 2. Create a class named "Contact" under the package "com.contactlist.domain".
The domain above is actually called the MODEL.
Step 3. Create a class named "ContactListContoller" under the package com.contactlist.controller. Now, this is where SPRING MVC will come in.
@Controller : You need this to indicate that THIS CLASS is a controller that CONTROLS the REQUEST being sent by the user.
@RequestMapping : This means that if you call this mapping, http://localhost:8080/contactlist/display, the method listAll will be called.
Note: Notice that, you are actually returning a STRING, which will be the filename of the JSP Page that you would create to show the contact list.
model.addAttribute("contactList", contactList) : This line actually PUTS the data to the model that would be RETRIEVED later in the JSP page. We will see this in a while.
Step 4. Create the JSP Page and name it "contactPage". All JSP pages should be saved in the /WEB-INF/views folder. So right click on views and choose JSP Page. If you can't find it, go to others and look for JSP page.
Explanation
<%@ taglib prefix="c" uri="http://java.sun.com/jsp/jstl/core"%> - Do not forget to put this on your JSP to be able to show the output. So basically, you can access any data you put on the model by using JSTL tags. In our case, since we used model.addAttribute("contact", contact); in our controller, we accessed it by
<c:out value="${contact.name}"></c:out> where name is a FIELD in the ContactList Domain. Learn more about JSTL tags here: http://www.tutorialspoint.com/jsp/jstl_core_param_tag.htm
So, let's see:
Controller [check]
Model [check]
JSP Page [Check]
and you're done! So now, let's run the program.
Controller [check]
Model [check]
JSP Page [Check]
and you're done! So now, let's run the program.
The complete directory hierarchy:
Voila!
http://localhost:8080/contactlist/display and look what we have here.
Questions that you may have in mind and couldn't find them on the internet? Ask me and I hope I have the answer.
OUTPUT
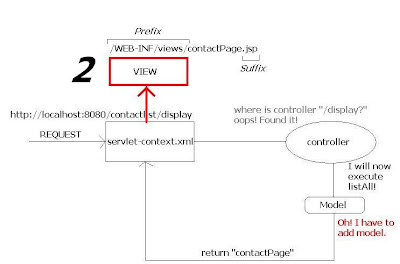
What is happening?
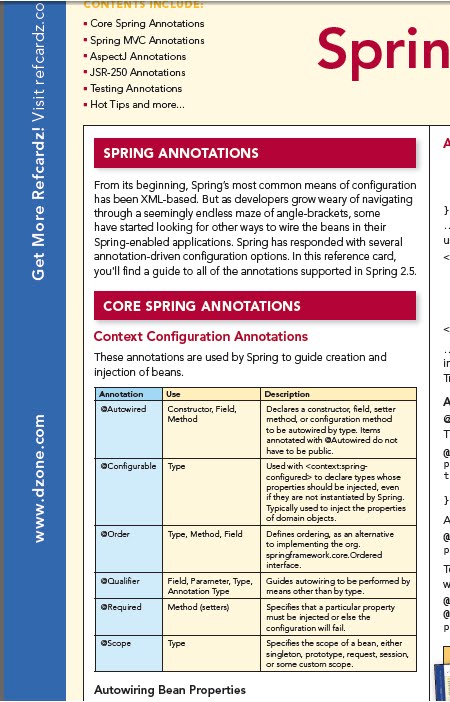
1. A request is being sent to the servlet as http://localhost:8080/contactlist/display. As you can see from the servet-context.xml file under src/main/WEB-INF/Spring/appServlet, you will find <annotation-driven/>, which means that Spring will look for annotations to find your controller. What are annotations? Annotations are @Controller, @Requestmapping and the like. Earlier versions of spring actually used XML instead of annotations until they introduced it at Spring 2.5. So now, Spring will find a controller with mapping
"/display" for you.
2. Spring finds controller with mapping "/display" and boom! Found it! Then performs the method to which it is mapped, in our case, listAll method. So it adds the model, because we have the line model.addAttribute("contact", contact);
3. return "contactPage". This string then goes back to the servet-context. Now, if you would look at the file, you will see a prefix and suffix. So therefore,
Prefix = "/WEB-INF/views/"
Suffix = ".jsp"
Wait, we have our jsp page on the /WEB-INF/views/ path right? so it means, we are in the VIEW part of the MVC and it actually creates the path for us. So, the servlet will now create the path /WEB-INF/views/contactPage.jsp for your app and voila! There's your list of contacts.
What's next? Noob forms and validation, Android Dev't, IOS Dev't, some struts and grails maybe. Who knows? Anway, if you have questions, just send me a message and I will TRY to answer it. Like what I've said: for the noobs by the NOOB. I'm also a beginner at this.
Have a happy weekend! xoxo.
DOWNLOAD THE WHOLE PROJECT: contactlist.zip
"Sharing knowledge is not about giving people something, or getting something from them. That is only valid for information sharing. Sharing knowledge occurs when people are genuinely interested in helping one another develop new capacities for action; it is about creating learning processes.
Read more: http://www.finestquotes.com/select_quote-category-Knowledge Sharing-page-0.htm#ixzz1r9b47fMz"
Eclipse: Java was started but returned exit code = 1
If you are recently faced with this error, it may or may not have something to do with your JDK or JRE.
Solution: Do a clean install of Eclipse, JDK and JRE again. I think is the best solution instead of configuring something from the .ini file.
Solution: Do a clean install of Eclipse, JDK and JRE again. I think is the best solution instead of configuring something from the .ini file.
Adding a new android platform in Eclipse
When we develop applications for Android, sometimes we need more than one platform. I will show you how to add a new one in your existing.
Go to Window > Android SDK Manager
Wait for it to load and a list of packages will be displayed.
Select the platform that you want and click Install packages..
A new window will open with the list packages to be installed, click Accept and wait for the download to finish.
Et voila, you can now create apps for that specific platform.
Tutorial Alert: Android Development
Most of you know that I'm creating Android apps along with a friend whom I met online. We are currently working on an MTR app for Hong Kong. (And more to come, hopefully) So of course, I was looking on some tutorials on the internet that would help me understand more about Android. Then I stumbled upon a list of videos on Android by a user named "The new boston" on Youtube. I have subscribed to their channel last year but only had the chance to view their videos this year.
This could really help you if in any case, you would like to help me in developing Android apps or creating something on your own. The first part is shown below.
Video List: http://www.youtube.com/playlist?list=PL34F010EEF9D45FB8
Note though that this is a 200 video playlist. Thumbs up to Travis!
This could really help you if in any case, you would like to help me in developing Android apps or creating something on your own. The first part is shown below.
Video List: http://www.youtube.com/playlist?list=PL34F010EEF9D45FB8
Note though that this is a 200 video playlist. Thumbs up to Travis!
Understanding Web Servers: Part 2
For the basic function of web servers, refer to Understanding Web Servers: Part 1
Consider the URL, http://clareciriaco.appspot.com/portfolio/about.html
Pink: Tells the server the communication protocol to be used. In this case, HTTP.
Red: The Server, which is mapped to an IP address.
Green: The resource path on the server where the resource can be found.
Blue: The resource requested by the client(Either a human being or a browser like Mozilla, IE).
Most resources being requested are HTML pages. The pages are then classified as Static and Dynamic.
A Static Page

A Dynamic Page
If you would notice, the static page's time will not change. It will always be 12:30 PM. However, if you look at the dynamic page, it will get the current server time. BUT! HTML alone does not have capabilities on getting the server time. Remember! HTML deals only with "How to display the data". What we need, is a WEB SERVER APPLICATION.
A Web Server Application does not change/alter/do anything with the resource. Instead, it FINDS another application on the server to help with getting the server time.
Image Source: Headfirst JSP + Servlets
Understanding Web Servers: Part 1
Most of us are confused with what web server really does. Sometimes, we also get confused with what languages we should use. This post will help you understand more about servers.
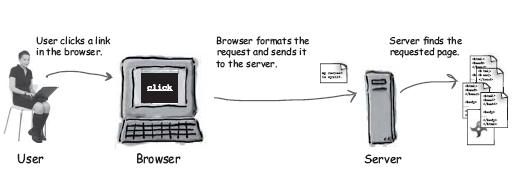
The main purpose of a web server is: A Web Server takes a request from a client and gives a response.
A client can be a human being or a browser such as Mozilla, IE, Chrome Etc. Before we start, here is a diagram showing the main purpose of a web server.
REQUEST
Request: A request could be an image, PDF File file or even an html page.

A request can have several methods. But the most commonly used are GET and POST.
GET: The simplest HTTP method which job is to ask the server to get a resource and send it back.
POST: More powerful than GET. You can request resources, and at the same time send data to the server. It's like GET + data sending capabilities.
RESPONSE
Response: Contains the actual document requested by the client. (Or error codes if the request cannot be processed.)
Image sources: Headfirst JSP and Servlets Book
Part 2: http://sandsations.blogspot.hk/2012/08/understanding-web-servers-part-2.html
The main purpose of a web server is: A Web Server takes a request from a client and gives a response.
A client can be a human being or a browser such as Mozilla, IE, Chrome Etc. Before we start, here is a diagram showing the main purpose of a web server.
REQUEST
Request: A request could be an image, PDF File file or even an html page.

A request can have several methods. But the most commonly used are GET and POST.
GET: The simplest HTTP method which job is to ask the server to get a resource and send it back.
POST: More powerful than GET. You can request resources, and at the same time send data to the server. It's like GET + data sending capabilities.
RESPONSE
Response: Contains the actual document requested by the client. (Or error codes if the request cannot be processed.)
Image sources: Headfirst JSP and Servlets Book
Part 2: http://sandsations.blogspot.hk/2012/08/understanding-web-servers-part-2.html
Installing Android in Eclipse
What you'll need:
Eclipse (I use Helios Indigo 3.7.2)
Where: www.eclipse.org/downloads/
How: http://eclipsetutorial.sourceforge.net/totalbeginner.html
Android SDK
Where:http://developer.android.com/sdk/index.html
There are two components in order to develop applications in Android. First, the SDK then the ADT.
1. Go to http://developer.android.com/sdk/index.html and download the SDK that fits your system.
2. Download the ADT Plugin
Go to help > install new software > add
A dialog will appear
Name: ADT Plugin
Location: https://dl-ssl.google.com/android/eclipse/
3. If there are troubles with the location URL, try using http instead of https.
4. Click OK and wait.
5. You will then see a new screen with a list of tools to be downloaded.
6. Select the checkbox for Developer Tools and click Next.
7. The read and accept license will then show up,read accept it then click finish.
8. Installation is now complete and you may restart eclipse.
After this, you have to modify the ADT to be able to use the Android SDK on Eclipse.
9. Select window > preferences
10. On the left side, you will see Android. Click Android. A screen like below should appear.
11. Click Browse and locate where you previously downloaded the SDK.
12. Click apply then OK .
Eclipse (I use Helios Indigo 3.7.2)
Where: www.eclipse.org/downloads/
How: http://eclipsetutorial.sourceforge.net/totalbeginner.html
Android SDK
Where:http://developer.android.com/sdk/index.html
There are two components in order to develop applications in Android. First, the SDK then the ADT.
1. Go to http://developer.android.com/sdk/index.html and download the SDK that fits your system.
2. Download the ADT Plugin
Go to help > install new software > add
A dialog will appear
Name: ADT Plugin
Location: https://dl-ssl.google.com/android/eclipse/
3. If there are troubles with the location URL, try using http instead of https.
4. Click OK and wait.
5. You will then see a new screen with a list of tools to be downloaded.
6. Select the checkbox for Developer Tools and click Next.
7. The read and accept license will then show up,read accept it then click finish.
8. Installation is now complete and you may restart eclipse.
After this, you have to modify the ADT to be able to use the Android SDK on Eclipse.
10. On the left side, you will see Android. Click Android. A screen like below should appear.
11. Click Browse and locate where you previously downloaded the SDK.
12. Click apply then OK .
Google App Engine Error: No matching index found.
Most gae developers are faced with this problem when running the project on your local host then deploying on GAE. I have suffered from this for quite a long time, and now I am sharing the solution I used.
com.google.appengine.api.datastore.DatastoreNeedIndexException: no matching index found.
Indexes are built when the definition file is uploaded to a server. It is needed for querying your data. And if this is not found, you get this error.
There are two possible workaround for this.
1. If you are testing from your local machine and a query is running, it is possible that /WEB-INF/appengine-generated/datastore-indexes-auto.xml is already created. Thus, you can deploy your application to GAE.
2. If you directly deployed the project to GAE, without running the query from your local machine, you can see that the file datastore-indexes-auto.xml is not found on the /WEB-INF/appengine-generated/ folder. Now, this may take sometime to be generated.
So what I do is, I run all the query once on local host, check whether the indexes has been generated and then deploy to GAE.
Installing Eclipse
You can get Eclipse by going to http://www.eclipse.org/download. To know which version you should get, refer to my previous post.
It is advisable that you download the latest version which, as of now, is Eclipse Indigo. After downloading, you will have a .zip file of Eclipse.
Note: It is also advisable that you unpack the .zip Eclipse file into a directory path that does not contain spaces in its name because sometimes, it can cause problems.
After unpacking, you can already see the eclipse.exe file, which indicates that Eclipse is ready to be used with no installation required.
Eclipse 101
Eclipse is a software development application that allows developers to create Java applications. However, since Eclipse has an extensible plug-in system, developers can also create applications using C, C++, COBOL, Python etc.
How do I get it?
When you go to the eclipse download site, you can see that there are different types of Eclipse. But these are not types. They are just VERSIONS named after the solar system. To sum it up,
source: http://wiki.eclipse.org/Older_Versions_Of_Eclipse
Which Eclipse should I get?
In every eclipse version, they also have different packages. To know more, check out: http://www.eclipse.org/downloads/compare.php
However, I would discuss the three top downloaded Eclipse IDE which are:
Eclipse IDE for Java EE Developer: Used mainly for building and running enterprise software, widely used for server programming, in other words, used for Web Development.
Eclipse IDE for Java Developer: Used mainly to build java applications.
Eclipse Classic:The basic eclipse without the EE part - support for web development.
How do I get it?
When you go to the eclipse download site, you can see that there are different types of Eclipse. But these are not types. They are just VERSIONS named after the solar system. To sum it up,
| Release | Date | Platform |
| Indigo | 2011 | 3.7 |
| Helios | 2010 | 3.6 |
| Galileo | 2009 | 3.5 |
| Ganymede | 2008 | 3.4 |
| Europa | 2007 | 3.3 |
| Callisto | 2006 | 3.2 |
| Eclipse 3.1 | 2005 | 3.1 |
| Eclipse 3.0 | 2004 | 3.0 |
source: http://wiki.eclipse.org/Older_Versions_Of_Eclipse
Which Eclipse should I get?
In every eclipse version, they also have different packages. To know more, check out: http://www.eclipse.org/downloads/compare.php
However, I would discuss the three top downloaded Eclipse IDE which are:
- Eclipse Classic
- Eclipse IDE for Java EE Developer
- Eclipse IDE for Java Developer
Eclipse IDE for Java Developer: Used mainly to build java applications.
Subscribe to:
Comments (Atom)


